Every year, for Valentine's Day, I give Jeffrey something handmade and memory-related. This year v-day came up super quick; somehow it was February 13th and I still had nothing started. Luckily I had gotten my Studio Calico box earlier in the day and had the evening to throw something together.
Showing posts with label love. Show all posts
Monday, February 18, 2013
Thursday, February 14, 2013
The Boy I Love
its this one...
I love him so much. I still surprise myself at how much I love him, and even more about how much more I love him each passing day.
Background: Jeffrey and I met in the spring of 2009 while working in one of the early local US census offices in Central NJ. We quickly become outside of work friends and I spent two weeks just trying to get him to like me until he came over for dinner one night and finally kissed me.
Why am I rambling on about this boy? Its a little weird to just be talking about this apropos of nothing; but I think its important to be genuine and I talk about him tons throughout the blog, he appears in all my project life spreads, his face is constantly on my instagram feed and he's a constant source of inspiration; so I thought it would be good if there was a place where I could explain who he is and what he means to me.
Background: Jeffrey and I met in the spring of 2009 while working in one of the early local US census offices in Central NJ. We quickly become outside of work friends and I spent two weeks just trying to get him to like me until he came over for dinner one night and finally kissed me.
Why am I rambling on about this boy? Its a little weird to just be talking about this apropos of nothing; but I think its important to be genuine and I talk about him tons throughout the blog, he appears in all my project life spreads, his face is constantly on my instagram feed and he's a constant source of inspiration; so I thought it would be good if there was a place where I could explain who he is and what he means to me.
Labels:
jeffrey,
love,
one little word,
one year of journaling,
valentines day,
write
Thursday, September 13, 2012
Tips for Layering Acrylic Pages on Minibooks
Hi Everyone, today I'm sharing one of my favorite ways to decorate a mini-book over at the Basically Bare blog. There are also a couple of tips on layering with acrylic pages.
I like making mini-books because they are self-contained and super easy to display. I have mini-books on display throughout my house. Because these books are set out for everyone to look at; one of my favorite ways to decorate a mini is to throw everything you can at the cover. Make the cover the star of your book.
See the entire post here: http://basicallybareonline.com/wordpress/?p=5878
Tuesday, February 21, 2012
Tutorial: I Love You Mini Envelope Book
I Love You Mini Envelope Book
Hey! Today I'd like to share with you a really cute little mini book that I made for Jeff for Valentine's Day.
The book is made from 6 little envelopes bound together with washi and artist's tape; and each envelope holds a tag with a special note inside.
Supplies Used:
- 6 Envelopes (You can use any envelopes for this project -- I used miniature tiny bag type envelopes for mine).
- Artist Tape (Masking Tape will do)
- Washi Tape
- Binder Clips/Clothespins
- 6 Tags cut to fit inside your envelopes
- Random Stamps & Embellishments for decorating
Step-by-Step:
1. The first step is to stamp/decorate the front and back of all your envelopes. I stamped the day of the week on the front of each of my envelopes; and the red punchinella pattern on the back.
When you're finished decorating your individual envelopes, we'll move on to binding the book together.
2. Stack all your envelopes together in order. You are going to be taping the CLOSED side of the envelope (the side across from the opening). Hold your envelopes together and place a strip of artist (or masking) tape binding together the group of envelopes. Don't worry if its not super stuck together just yet, we'll be taping the inside envelopes together in the next step.
Trim off the excess tape from the top and bottom of the book of envelopes, and grab your washi tape for the next step.
3. Now we are ready to bind the inside pages together. Open your book up to the first set of pages. Place a strip of washi tape down the center, making sure that you get the tape on both sides. Repeat this step for each of your inside pages.
Once you trim off the excess washi tape, grab two binder clips (or clothespins) and clamp down your binded edge. This will ensure that your tape sticks as much as possible and that the pages on your book will open easier. Leave on the clips for an hour or two, and then we'll move onto the next step.
4. The last step is to add in the tags and decorate the cover of the book. Grab your stamps, and your stickers, and whatever other embellishments you're in the mood for and go to town.
Stick a tag inside each of the envelopes, decorate the cover and then you're totally done! I added some bling and a little heart to my cover.
Thanks so much for stopping by! If you like the project, feel free to pin it so that you have easy access to it all the time!
Thursday, November 10, 2011
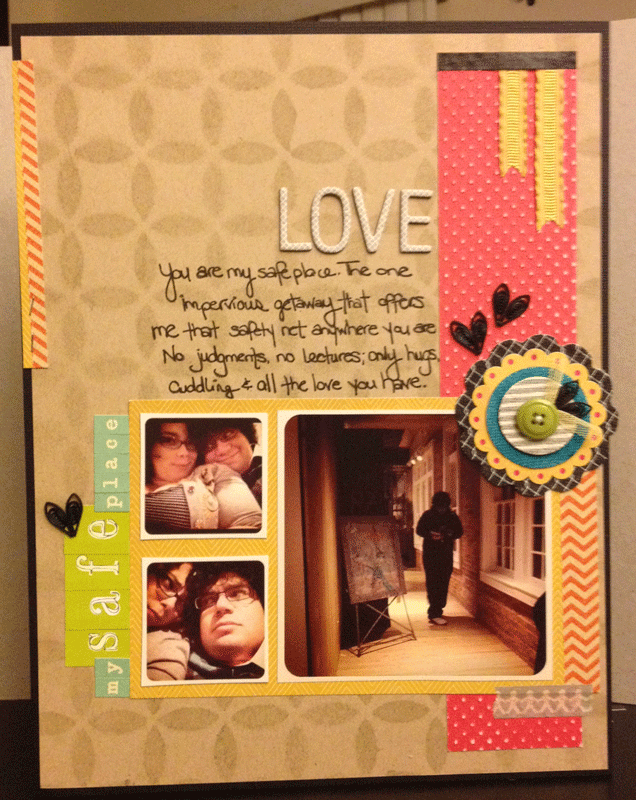
My Safe Place
A quick update with a new layout. Its the first time I've scrapped 8.5x11 in a really long time. I used the new Studio Calico November Kit: Handmade.
The page was created for this week's challenge at ScrapYourself: Scrap your "Safe Place". I decided that I would scrap the person that I go to, instead of a literal place, when I need to feel safe.
Thanks for looking :)
The page was created for this week's challenge at ScrapYourself: Scrap your "Safe Place". I decided that I would scrap the person that I go to, instead of a literal place, when I need to feel safe.
Thanks for looking :)
Labels:
8.5x11,
layout,
love,
scrapyourself,
studiocalico
Subscribe to:
Posts (Atom)


.jpg)


.jpg)
.jpg)
.jpg)
.jpg)
.jpg)
.jpg)
.jpg)
.jpg)
.jpg)
.jpg)
.jpg)
.jpg)
.jpg)