Showing posts with label organization. Show all posts

Tuesday, May 28, 2013

Packing a Kit for Project Life


This past Friday I was lucky enough to take a quick trip into Manhattan for a scrappy afternoon at my friend Julie's apartment. Because NYC space tends to be a bit tighter than average, I needed to pack light. I decided to work on my Project Life album, and packed everything I needed into this empty core kit box (the empty boxes and trays are now available on Amazon) and a plastic legal envelope from the container store.

Friday, April 19, 2013

Mini-Book Organization with a Project Box


On my desk right now. I'm currently working on an All About Me mini-book in conjunction with the Studio Calico This is Me workshop by Lexi Bridges. Mini-books have always been my favorite memory-keeping projects but to keep them from getting overwhelming, with supplies all over the place, I keep all the supplies in a Project Box.


My Project Box is made out of a Sterilite Large Clip Box. I bought these in bulk and they stack perfectly in my expedit shelving unit, so that I can work on several projects at once and still keep everything organized. I'll let you in on a little secret -- my 2012 December Daily is still in its Project Box because I haven't finished it up.

The first step in creating a Project Box is to decide on an overall theme. For this project I chose a palette of bright feminine colors with lots of graphic patterns and black/white as my neutral colors.

Project Box Essentials:

Even though this box is specific to the all about me mini-book, each box has the same six essentials:

  • Ink Pads: Small ink pads (like the Dew Drops pictured) fit right inside the project box and are perfect for both stamping and distressing. Pick out colors that match your color pallet. A black ink (not pictured) is always in the bottom of my project box as well. My two favorites are Versafine Onyx and Staze On. 
  • Pen: At least one journaling pen. My go-to pen is the Sakura Microperm; it is smudge-proof and writes beautifully. 
  • 6x6 Paper: Small paper pads are my new favorite way to buy scrapbook paper; its the best of both worlds -- one of each design & and a smaller, more reasonable amount of paper to use. For this project I'm using Basic Grey's Knee Highs patterned paper -- love those colors. 
  • Alphas: At least one set of alphas. I prefer the smaller alphas (like the Basic Grey ones seen here) for mini-books and larger projects because of the amount of letters per sheet. I know that I'm not going to run out of E's or S's in the middle of a project and freak out. 
  • Washi Tape: It's a great multitasker and my favorite scrapbook embellishment right now. This box has rolls with graphic patterns and this very cool label washi tape from Fab. 
  • Bits & Pieces: In the corner of my Project Box I keep a small container for little odds and ends; wood chips, flair, buttons, etc. This way the little bits don't fall to the very bottom.  

Inside Pages
Here are some photos of the inside of my book so far. I've been working on it at night when I catch a spare hour or two. I'm really enjoying digging deeper into my story and documenting all the me stuff; the silly and the serious. 


**Weekend Sale at shop.rukristin.com. FREE SHIPPING with orders over $25!! Enter code: FREESHIP  (US only). All international orders receive $6 off shipping charges -- leave a message at checkout.

Supplies Used:


rukristin papercrafts participates in several affiliate programs including amazon, two peas in a bucket, and several others; thanks for supporting this blog by making purchases through those links.

Monday, January 28, 2013

4 Ways to Feel Good About Your Daily To-Do List

Lists keep me organized & I love daily to-do lists.

They help me stay on track for the day and not get lost in the twitter-verse, on facebook, or anywhere else in the deep, dark, never-ending hole that can be the internet.

My go-to organizational tools are Google Calendar, TeuxDeux (on both the computer and my iPhone), and a pen & paper.

I write out my to-do lists every day. Appointments that I need to keep and special dates go on the calendar. All the tasks that I need to accomplish get put on TeuxDeux -- my favorite feature is that tasks roll over to the next day if they aren't crossed off. For everything else that I need to get done around the house I make a daily to-do list on paper.

I rarely ever check off everything on my list, and that's okay. To-do lists are more about keeping me on track to work on the important things throughout the day and not about making sure every last thing gets done before I go to sleep.

Here are four things I do that make daily to-do lists work for me
  1. Write down all the stuff you have to do: Not just the important things, not just the business/work stuff, not just the physical tasks. Write it all down. There are so many things that we have to do throughout the day that sometimes they overwhelm the other responsibilities we have and at the end of the day it looks like nothing has been accomplished. So make a habit of writing it all down
  2. Break it up into smaller tasks: Instead of 'Cook Dinner'; write out some steps: Take the meat out of the freezer, chop vegetables, pre-heat the oven. This way you can start to accomplish your big tasks
  3. Add already accomplished tasks:  Add on the extra stuff you had to do but already accomplished. It will help your to-do list feel more complete (and accurate). 
  4. Start your to-do list the day before: At the end of the day, I'll start my to-do list for tomorrow. It helps me to de-stress and no longer worry about everything that needs to get done tomorrow because I know when I wake up its already on the list 
A daily to-do list shouldn't be just a list of things that you need to accomplish by the end of the day. It also needs to be a list of the things you have accomplished and your progress throughout the day.

PS - If you love lists, make sure you check out the next round of 30 Days of Lists coming in March! 

Monday, December 10, 2012

Organization Week Coming in January. Help Needed!


Coming in January: Organization Week! I'm currently making a brand new craft area and next month I'll be sharing all of my organization tips and tricks, along with some great guest posts and amazing ideas from other crafters.

If you would like to contribute, please email me.

Let me know if you are interested in contributing:

  • Guest Post
  • An Organization post your blog
  • Pictures
  • Tips/Tricks
  • Some of your favorite blog posts written by others
  • Pinterest Boards
  • Anything at all! 
Any questions, please send me an email. I'm looking for all sorts of voices! 


Tuesday, June 19, 2012

New Organization: Ikea Raskog Cart

I've had my eye on this cart for a couple of months now. I first spotted it on Pinterest, and its been in the back of my mind ever since.
On Friday, Jeff went to Ikea and picked it up for me -- a total and wonderful surprise :) 

I put it together over the weekend, and man is it sturdy. I am super impressed with it, and I am totally enabling here and telling everyone they should go out and get their own (it also comes in a really pretty turquoise).


It holds so much stuff, it really gave me a ton of new space in my scrappy area -- and since I scrap in a common area of the house, it'll be really easy to just roll it out of the way when we have company.

What's in my cart:  


The top tier holds two of my bigger organization containers. On the left is a blue basket (from 5 & Below) that holds all of my taller embellishments. Lots of stickers, labels, flair, journaling tags, etc. 

And that big yellow thing is a vintage canister set from my mother-in-law (its supposed to hold sugar, tea, flour, etc). But after decorating it a bit with Amy Tangerine Washi tape, it works perfectly for extra scrappy storage. One canister holds brads/buttons, extra stamps, etc -- I tend to rotate that around often. 


The second tier has all of the bowls that I keep on my desk while I'm working. One has all of my 'current' stamps (mostly Studio Calico), one has 'new/small embellishments', and the other has 'SC kit embellishments'. Those will eventually get placed in the big blue basket if I don't use them within the month. 


And the bottom tier has a bunch more baskets. One holds my Prima and Jenni Bowlin ink pads, a box of Mr. Huey's, Project Life journaling cards, extra pens, and markers. 

Thanks so much for stopping by today!

Follow me on: 
Instagram: rukristin

Lots and Lots of Love!
K

Saturday, March 24, 2012

ProTip: Extending the Life of Scissors

Quick Tip: How to extend the life of your scissors. 

Whenever I feel my scissors start to stick and feel a little gummy, I know its time to clean them. Cleaning scissors is super easy and one of the most effective ways to keep them around for as long as possible.

What you need: 

  • Dirty scissors 
  • Rubbing Alcohol
  • Q-Tips
Step One: Grab your supplies (I have two bottles of rubbing alcohol--obviously you only need one)


Step Two: Soak the Q-Tip in a little bit of rubbing alcohol (until the tip is sufficiently wet)


Step Three: Use the Q-tip to clean the blades of your scissors. Press down as hard as necessary to get off all the sticky stuff. Repeat as much as needed. I usually go through two Q-tips for each pair that I clean. Remember to clean the narrow sides of the blades too!


Now you can have awesomely clean scissors, and they'll last longer and work better! 

Wednesday, March 21, 2012

Weekly Calendar Template

I need to be a little more organized. Not a lot more, just that one extra step of organization.

I've looked up and down for a good weekly calendar that suits my needs, and I just haven't come up with any that I'm in love with. There were just a couple of specific things that I wanted to keep track of every day and I wasn't finding a good fit.

So I took a couple hours the other day and came up with one completely tailored to my needs.


It has check-boxes at the top for Creative Time and Technical Time so that I can keep track (and keep balanced) my actual crafting time from my blogging and photo editing time.

It also has check-boxes for Breakfast, Lunch, and 8 glasses of water a day -- because I absolutely forget to eat and then I'm just not a happy camper.

I'm not sure if anyone else will have a use for it -- but if someone else can use it too, then awesome!

You should just be able to right-click on the photo and save it to your hard drive. Feel free to pin it to Pinterest to save for a later date or for inspiration on your own custom weekly calendar.


Wednesday, January 11, 2012

Project Life Organization


Project Life | Organization

Now that we're a full week into Project Life, I've finally gotten myself about as organized as I'm going to get. I do most of my scrapping at my living room table so I like to have my stuff in portable storage. 

I keep a large milk crate (about 12x18) underneath my table, and inside I have a couple of different containers to store the stuff I use on an everyday basis. 

Top Image from Left to Right, Top to Bottom
The first two pictures below show the inside of the crate. On the left is a clear desk organizer that I keep smaller embellishments and journaling cards. On the right is a picture of the crate when I stick my project life kit box right on top. 

The bottom left photo has a pencil/tool holder that I made one afternoon out of some leftover toilet paper rolls (classy, I know). I keep that right on top of my table and can throw things in and out as need be. 

The last picture here shows all of my letter stickers and any other large embellishment sheets. I'm storing them in a wooden bill container? I'm not entirely sure what its called. It has a slot for each day of the month and you're supposed to throw your bills in there so you know when to pay them lol. There is a little drawer underneath where I keep my patterned paper. 


The next picture is my new favorite toy. Its a vintage canister set for the kitchen, but I re-purposed it with some washi tape and a dymo label maker. I like that you can stack each of the parts in any order, so it doesn't matter too much which is on top. 

What's inside?
  • Inks and Zing powders
  • Washi Tape
  • Buttons and Brads
  • Little Stamps and Punches
I keep my larger stamps and punches in metal buckets on the desk behind me, and grab them as I need them. As long as everything has its own place, I know where it is and where to look for it when I want it.  What are some of your favorite crafty organizational secrets? Project Life or not.

I'm sure that I'll change my organization system around as the year progresses, but I'm really happy with where it is now. It's both totally functional and adorable! Thanks for stopping by.

--K

Saturday, December 3, 2011

December Daily | Day 3

Three days into December, and my December Daily is going pretty well. I think its partially because of how organized I got before the project began.

Here is my setup: I keep most stuff right on my table. I made a little desktop organizer with some toilet paper rolls and scrap paper. Keep my pens, liquid glue, hole punch, paintbrushes, etc in there. Having eight separate holes makes it a lot easier to see what's inside and grab what I need.


My December Daily supplies are kept in this plexiglass desk organizer. It has three small square compartments at the top and one long compartment at the bottom. I stuck an egg carton in the long compartment so I could hold and separate all my little embellishments.  The three compartments at the top hold (in order from L to R):
1. Mr. Huey's and stamps
2. Tags, paper embellishments
3. Adhesives


Thanks for stopping by. Have a great weeekend!

Tuesday, January 11, 2011

Mission Organization: Complete!

My moving and organizing is FINALLY done!!!!

Now I'm generally not a neat person. I'm an organized person, but I'm not neat. So please don't mind the messyness that are in the pictures. But I'm really proud and happy of the way everything looks and how its all set up. I think its going to work fantastically well for me!


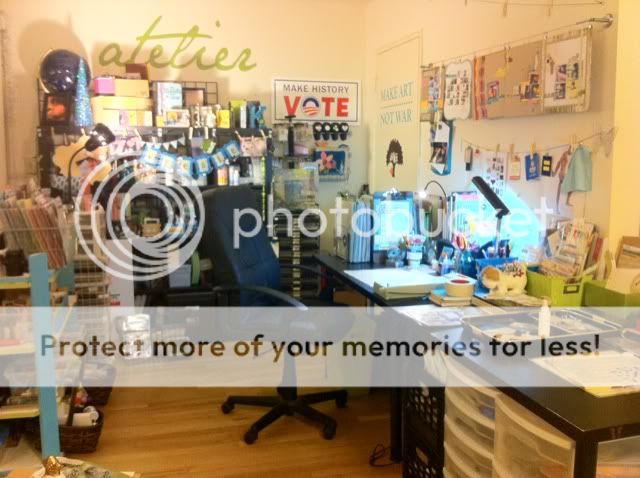
First, here's an overview picture of the whole area. On the right hand side there are two 2'x4' table next to each other, giving me a total workspace of 2'x8'. Its the biggest workspace I've ever had, and omg is it making a HUGE difference. Its so much easier when I have everything I want right at my hands.


In this picture you can see the right table. Underneath are two of those sterilite rolly-wheel things. In the one on the left I have office supplies, hardware (metal stuff, chains, etc), markers, and ribbon. In the one on the right I have projects that I'm in the middle of working on, blank mini books, and the bottom is for stuff I don't know where to put (extra heat gun, glue gun, etc). To the left of those I have two legal size milk crates that my wonderful boyfriend acquired for me late one night. In there I keep my heat gun, my binder for my memorabilia project, my crop-a-dile, a cleaning rag. They are really nifty.


Here's the left table, this is supposed to be the general work area. I have my Ranger craft mat down in the middle, and my trimmer to the right. Above the table I have some string to hang inspirational stuff, and above that I have metal wire that I got from Ikea that I hang my new layouts on. There is a garbage underneath this table, but not much else. More about the other stuff in the next few pictures!


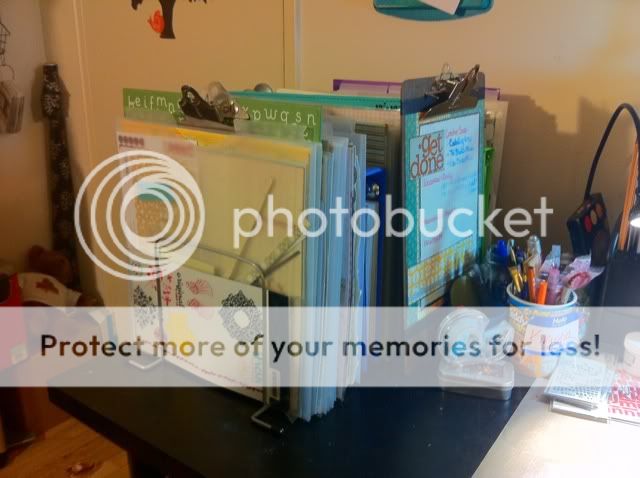
This is all my paper. The metal thing is a legal size paper sorter--the kinda thing you would put in a filing cabinet to organize stuff. Most of my paper is in kits--either SC--or ones I make up myself, and then put into those Cropper Hopper 12x12 plastic sleeves. I also keep my stamp binder, my sketch binder, and 12x12 embellishments (chipboard sheets and whatnot) in there. If you look closely can also see a former little cup of teddy grahams that I keep pens in. The nametag on there was made by Julie Fei-Fan Balzer when I took her altered book class in NYC last month <3.


That black slotted organizer-y thing is one of those old fashioned "pay your bills on time things". I don't know what they're called, but it has a slot for each day of the month. I just stuck my most often used embellishments in there, they fit perfectly, and I love having them right in front of me. If you look close you can see the canvas I made on Sunday. He really is a very cute boy and I'm pretty sure he likes me a lot. :)


Here's the top of the other table (on the right). Those blue and green bins are where I'm storing my "I want to use right now/brand new" embellishments. The blue one has the "3D" embellishments--chipboard, metal, anything with some thickness. The green one has all my flat embellishments -- stickers, rubons, etc. The long black tray has the kinds of things that I would randomly leave out on my table, along with another little black tray inside it which holds all my tiny embellishments that I need to shuffle through in order to use them. My photos are in the center. I've been printing out a lot of hipstamatic and instagram photos from my phone, and oddly enough they fit perfectly into my birth control envelopes. So that's how I've been organizing those little photos!

Ooh! and one of my favorite things! See the little doggie? He has all my decorative pins stuck in him like a pin cushion! Animal lovers don't worry, he has a little magical flower on the side of his ear that makes him feel no pain ;). 


The Expidit. Not much more to say about it. It holds a ton of stuff. Mostly the bulky stuff I don't use every day. The drawers on the right hold all my flowers and some old photos. I have a basket for my mists, my ink pads, etc.


This is maybe my favorite piece of furniture in the house. My uncle's father built it back in the 50's and my aunt gave it to me when they were cleaning out his house. I painted it with some color, and ta da! Its actually upside down here, because I needed it to hug the couch with its weird L shape.  On the top are all my alphas in a vintage basket. A couple more baskets of embellishments that are a little older, but I still would like to have access to. Bins with markers, bling, journaling cards, etc. The bottom shelf has my paint basket, my adhesive basket, and my chipboard basket. 


Lastly I just wanted to show this off. I really like getting 6x6 paper pads when I like an entire line, and those fit perfectly in this Got Flowers basket that I picked up at my LSS a couple years ago. Its from Prima, those glass bottle flowers came in here. I just love it. 

If you actually read this entire post, thank you lol. If you have any questions, please feel free to ask. :) I feel so great about organizing all my stuff. Now I know exactly what I have and where it is; which will help me create so much faster! Now to get back to some real scrapping!

Thursday, January 6, 2011

Organizing!

My organizational journey is happening! I have my tables put together; and all my crap all over them! but its starting to look like an actual work area!

Here's a quick picture of the disaster area.

Photobucket

My goal for today is to get everything totally organized so I can start scrapping and being artsy again! My shoulder has been so much better, I've been able to do things and not have to worry about keeping my arm in a sling every day! It does ache after I use it a bit too much, and at night; so its still a matter of figuring out how much I can do at one time. But its totally on the mend!